If your IIS server is a Windows 7 or Windows Server 2008 system using IIS version 7 or greater, you need to verify the following settings to enable the Web Client to work with your server. See
|
Settings |
Value |
|---|---|
|
CCure9000Web Application Pool .NET Framework version |
.NET Framework v4.0.30319 |
|
CCure9000Web Managed pipeline mode |
Integrated |
|
CCure9000Web Physical Path |
%SystemDrive%\Program Files (x86)\Tyco\CCure9000WebClient |
|
CCure9000Web Windows Authentication |
Enabled |
|
CCure9000Web Anonymous Authentication |
Disabled |
|
CCure9000WebClient Default Document |
WebStar.html |
|
CCure9000WebClient Directory Browsing |
Enabled |
The following section describes the process for configuring the C•CURE 9000 Web Client for Windows Server 2008 or Windows 7. Be sure to complete the following tasks first:
| ■ | Install Windows Server 2008 Operating System (32- or 64 bit) or Windows 7 Operating System (32- or 64 bit). |
| ■ | Enable the Internet Information Services (IIS) Manager using Control Panel>Programs and Features>Turn Windows features on or off. |
| ■ | Install C•CURE 9000. |
To Configure the Web Client for Windows Server 2008 or Windows 7
| 1. | Click the Computer icon on the desktop. |
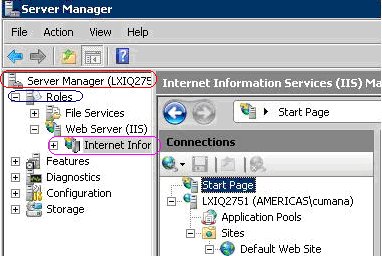
| 2. | On Windows Server 2008, click Server Manager > Roles > Web Services (IIS) > Internet Information Services (IIS) Manager. |
(On Windows 7, right-click the desktop Computer icon and select Manage, then select Services and Applications>Internet Information Services (IIS) Manager from the Computer Management in the left pane.)
| 3. | On left pane under Connections, select Application Pools. |
| 4. | On middle pane under Application Pool select CCure9000Web. |
| 5. | On right pane under Edit Application Pools, click Basic Settings. This opens Edit Application Pool. Verify that the .NET Framework version is set to .NET Framework v4.0.30319 and the Managed pipeline mode is set to Integrated. |
| 6. | On the left pane under Connections, select Sites>Default Web Site. |
| 7. | On the right pane under Edit Site, click Basic Settings. |
| 8. | On Edit Site dialog box, click Select then choose ‘CCure9000WebClient.’ |
| 9. | In the Physical path field, type in %SystemDrive%\Program Files (x86)\Tyco\CCure9000WebClient, then click OK. |
| 10. | Click Test Settings. The Test Connection Database opens and displays that the Authentication is valid. |
| 11. | On the Connection pane, go to Sites>Default Web Site. |
| 12. | Select CCure9000WebClient. /CCure9000WebClient Home displays in the middle pane. |
| 13. | Ensure that the CCure9000WebClient is an application (you will see Manage Application in the right pane). |
| 14. | If CCure9000WebClient is not an application, click the Convert to Application selection, then type CCure9000WebClient in the Alias field, click Select and choose DefaultAppPool from the drop-down list, and click OK. |
| 15. | To verify CCURE9000WebClient path settings, on left pane under Connections, right-click CCure9000WebClient > Manage Application > Advanced Settings. |
The CCURE9000WebClient Advanced Settings Database displays.
| 16. | To add the WebStar.html as a Default Document: |
a. Under IIS section in the middle pane, , double click on Default Document.
b. In right pane under Actions, click Add.
c. In Add Default Document Database, enter WebStar.html and click OK.
| 17. | To enable CCURE9000WebClient Directory Browsing: |
a. In left pane under Connection select CCURE9000WebClient.
b. In the middle pane under IIS, double-click Directory Browsing.
c. In the middle pane, Directory Browsing is displayed (by default, Directory Browsing is disabled). In the right pane under Actions, click Enable.
In middle pane, note that Directory Browsing is now enabled.
| 18. | To launch Windows Internet Explorer and open the C•CURE 9000 Web Client, in left pane under Connections, right-click CCURE9000WebClient > Manage Application > Browse. |
.
The Windows Internet Explorer C•CURE 9000 Web Client - Windows Authentication displays.
| 19. | Enter a valid operator, domain and password, and the C•CURE 9000 Web Client page displays. |