Personnel Images Tab

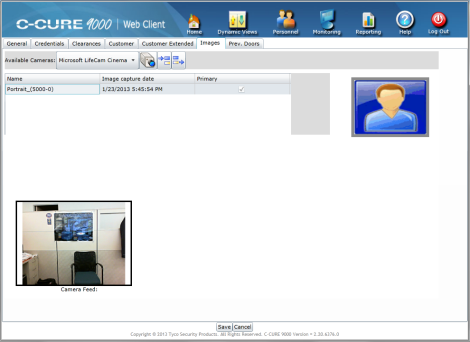
The Personnel Images tab shows the images for the selected Personnel record. It also allows you to add Images to a Personnel Record, or remove them.

You ca add an Image from an Image file accessible from your local Web Client system, or you can add an image that you capture with a locally attached camera.

While editing a Personnel record, you can add images to the Images tab from both image files and from a locally attached camera during the same editing session.

Figure 16 shows the Personnel Images tab.

Figure 16:  Personnel Images Tab

Personnel Images Tab Tasks

Adding an Image File to a Personnel Record
Adding an Image from a Local Camera to a Personnel Record
Removing an Image File from a Personnel Record

Personnel Images Tab Definitions

Table 10 describes the fields and buttons on the Personnel Images tab.

Table 11 describes the fields and buttons available on the Capture Image dialog box.

Table 12 describes the fields and controls available for cropping images on the Crop Image dialog box.

Table 10:  Personnel Images Tab

Field/Button

Description

Available Cameras

This field lists the cameras that are available on the local system. You can select the camera you wish to use to capture images for the Personnel record.

Capture Image from Camera

Click to capture the image currently displayed on the selected camera.

Add Image from File

Click to add an image to the Personnel record from an image file. A file selection dialog box opens to let you select an Image. When you select an image file and click Open, the image is displayed and can be cropped. The file is then compressed and saved to the C•CURE 9000 database.

Remove Selected Image

Click to remove the selected Image from the Personnel record.

Selected Portrait

This field shows the currently selected portrait image.

Name

This column lists the name of the images files in this Personnel record.

Image Capture Date

this column indicates the date when each image file was captured or added.

Primary

This area displays the currently selected primary image. Only one image can be the primary image for a Personnel record.You can change

You can designate an image as the primary portrait by selecting the check box .

Save

Click to save the image(s) you have added.

Cancel

Click to cancel adding an image.

Table 11:  Personnel Images Capture Images Dialog Box

Field/Button

Description

Camera Name

This field lists the cameras that are available on the local system. You can select the camera you wish to use to capture images for the Personnel record.

Crop Image

Click to crop (select a portion of the image) the image currently displayed on the selected camera.

Save Image

Click to add an image to the Personnel record from an image file. A file selection dialog box opens to let you select an Image. When you select an image file and click Open, the file is saved to the C•CURE 9000 database.

Table 12:  Personnel Images Crop Image Dialog Box

Field/Button

Description

Cropping Rectangle

You can use the mouse to draw, move, and resize a rectangle that allows you to crop the image from your camera.

Left-click and hold to start drawing the rectangle.

Drag to enlarge the rectangle's length and width.

Release the left mouse button to complete the rectangle.

You can select any side of the rectangle again with the mouse to resize it.

You can also reposition the rectangle by clicking inside the rectangle, then holding down the mouse button and dragging the rectangle to a new position..

Save

Click to save the image to the Personnel record.

Cancel

Click to cancel capturing the image.